
LightsailのUbuntu20.04にLAMP(PHP8.1)環境を構築し、Laravelのプロジェクトを導入していきます。
LAMP環境の構築はこちらの記事を参考に構築してください。
LAMP環境
- Laravel 9
- Ubuntu 20.04
- Apache 2.4.41
- MariaDB 10.5.15
- PHP 8.1
Composerの導入
Composer本体のインストール
Composer本体のインストールをします。
公式のコマンドからインストールしてください。
※以下は例となります。バージョンによって変わるため、必ず公式のコマンドを実行してください。
$ php -r "copy('https://getcomposer.org/installer', 'composer-setup.php');"
$ php -r "if (hash_file('sha384', 'composer-setup.php') === '55ce33d7678c5a611085589f1f3ddf8b3c52d662cd01d4ba75c0ee0459970c2200a51f492d557530c71c15d8dba01eae') { echo 'Installer verified'; } else { echo 'Installer corrupt'; unlink('composer-setup.php'); } echo PHP_EOL;"
$ php composer-setup.php
$ php -r "unlink('composer-setup.php');"
どのディレクトリからでもComposerを実行できるようにする
$ sudo mv ./composer.phar $(dirname $(which php))/composer && chmod +x "$_"
$ composer -v
これでcomposerの導入は完了です。
Laravelプロジェクトのインストール
新規プロジェクトの場合
こちらでは新規でLaravelのプロジェクトをインストールします。
/var/wwwに移動します。こちらにプロジェクトを作成していきます。
$ composer create-project --prefer-dist laravel/laravel laravel
$ cd laravel
既存プロジェクトの場合
Gitの設定
まずはgitの設定をします。
以下のコマンドを実行してください。
メールアドレスはgithubに登録しているご自身のものに書き換えてください。
$ ssh-keygen -t rsa -C "your_email@gmail.com"
$ cat ~/.ssh/id_rsa.pub
公開鍵をGithubに登録して下さい。
Githubの設定に関してわからない方は以下の記事を参考にしてください。
https://qiita.com/junokichi/items/5805af8398800c3b9cc5
Laravelプロジェクトのインストール
gitの設定まで完了したら対象のLaravelプロジェクトをcloneします。
$ cd /var/www
$ git clone git@github.com:XXXXXXXX/XXXXXXXX.git laravel
$ cd laravel
$ composer install
$ cp .env.example .env
$ php artisan key:generate
これでLaravelプロジェクトの導入は完了です。
Apacheの設定
URLを叩いた時にLaravelのプロジェクトが表示されるようにApacheの設定を変更します。
Apacheの設定ファイルは/etc/apache2/sites-enabled/000-default.confです。こちらのファイルを開きましょう。
$ sudo vim /etc/apache2/sites-enabled/000-default.conf開くと以下のように記述されています。
<VirtualHost *:80>
        # The ServerName directive sets the request scheme, hostname and port that
        # the server uses to identify itself. This is used when creating
        # redirection URLs. In the context of virtual hosts, the ServerName
        # specifies what hostname must appear in the request's Host: header to
        # match this virtual host. For the default virtual host (this file) this
        # value is not decisive as it is used as a last resort host regardless.
        # However, you must set it for any further virtual host explicitly.
        #ServerName www.example.com

        ServerAdmin webmaster@localhost
        DocumentRoot /var/www/html

        # Available loglevels: trace8, ..., trace1, debug, info, notice, warn,
        # error, crit, alert, emerg.
        # It is also possible to configure the loglevel for particular
        # modules, e.g.
        #LogLevel info ssl:warn

        ErrorLog ${APACHE_LOG_DIR}/error.log
        CustomLog ${APACHE_LOG_DIR}/access.log combined

        # For most configuration files from conf-available/, which are
        # enabled or disabled at a global level, it is possible to
        # include a line for only one particular virtual host. For example the
        # following line enables the CGI configuration for this host only
        # after it has been globally disabled with "a2disconf".
        #Include conf-available/serve-cgi-bin.conf
</VirtualHost>
この中で、以下のように変更してください。
DocumentRoot /var/www/laravel/public
<Directory "/var/www/laravel/public">
    Allowoverride All
</Directory>
変更したら:wqで保存してください。
Apache2でmod_rewriteを有効にする
a2enmodというコマンドを実行する。
$ sudo a2enmod rewritea2enmodを実行すると以下の様なメッセージが出てきます。
Enabling module rewrite.
To activate the new configuration, you need to run:
  service apache2 restart
Apacheを再起動します。
$ sudo service apache2 restartこれで設定は完了です。lightsailのIPアドレスにアクセスしてみてください。
おまけ
nodeとnpmのインストール
Breezeなどのログイン機能などを実装されている場合はデフォルトでviteが使われているため、npmを利用する必要があります。
npmをインストールしてみましょう。
$ sudo apt install nodejs npm
$ sudo npm install n -g # nコマンド導入
$ sudo n lts # 安定版のインストール
$ node -v
v18.12.1
$ npm -v
8.19.2
npmパッケージのインストール
$ npm install
$ npm run build
サーバーのスペックが低い($3.5)とnpm run buildで全然処理が終わらない場合があります。
その場合、一度サーバーを再起動して試してみてください。
MariaDBの設定
MariaDBの設定をし、Laravelでmigrationまでしていきます。
まず、MariaDBのrootアカウントのパスワードを確認しましょう。
$ mysql -u root -p
Enter password: #パスワードを入力

MariaDB [(none)]>
MariaDB [(none)]>create database laravel;
MariaDB [(none)]>show databases;
+--------------------+
| Database           |
+--------------------+
| information_schema |
| laravel            |
| mysql              |
| performance_schema |
+--------------------+
4 rows in set (0.000 sec)
はい、DBの作成まで完了です。
Control + Dでログアウトします。
それではLaravelでDBの設定をしましょう。.envを以下のように編集してください。
DB_PASSWORD="MariaDBパスワード"これでmigrationすればテーブルが作成されます。
$ php artisan migrateドメイン設定
ドメインの設定をしていきます。
お名前.comやムームードメインなどでドメインを取得し、DNSを設定していきます。
ドメインの取得方法は割愛しますが、今回はムームードメインを元に解説していきます。
ムームードメインの場合、サイドメニューのムームーDNS>処理「変更」ボタンの順に進んでください。
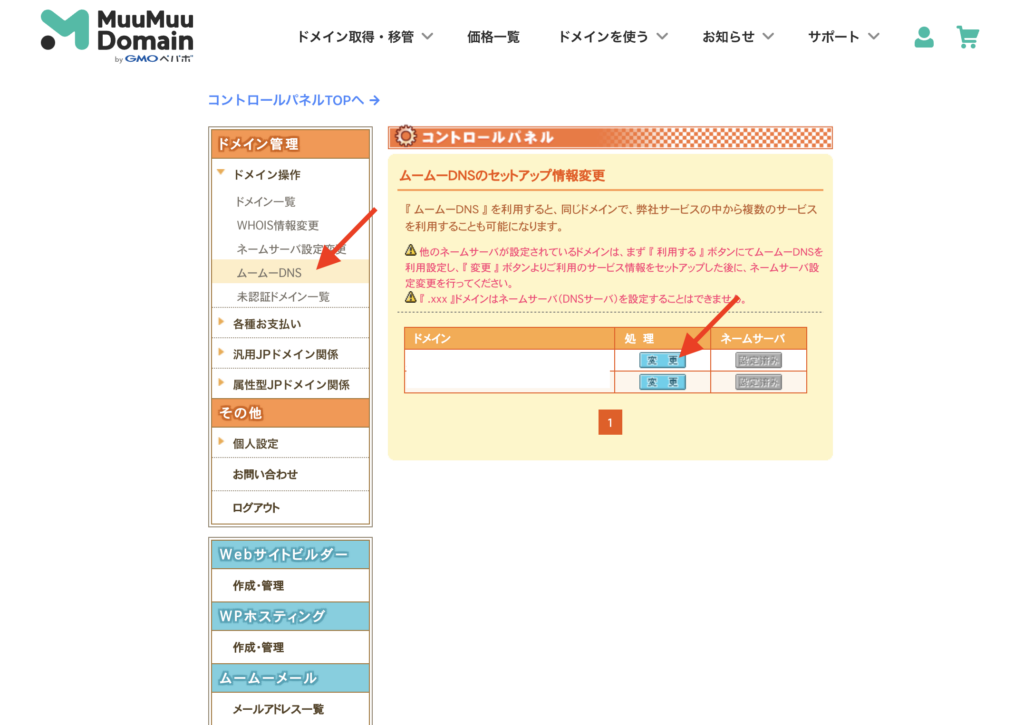
種別をA、内容にサーバーのIPアドレスを入力してください。
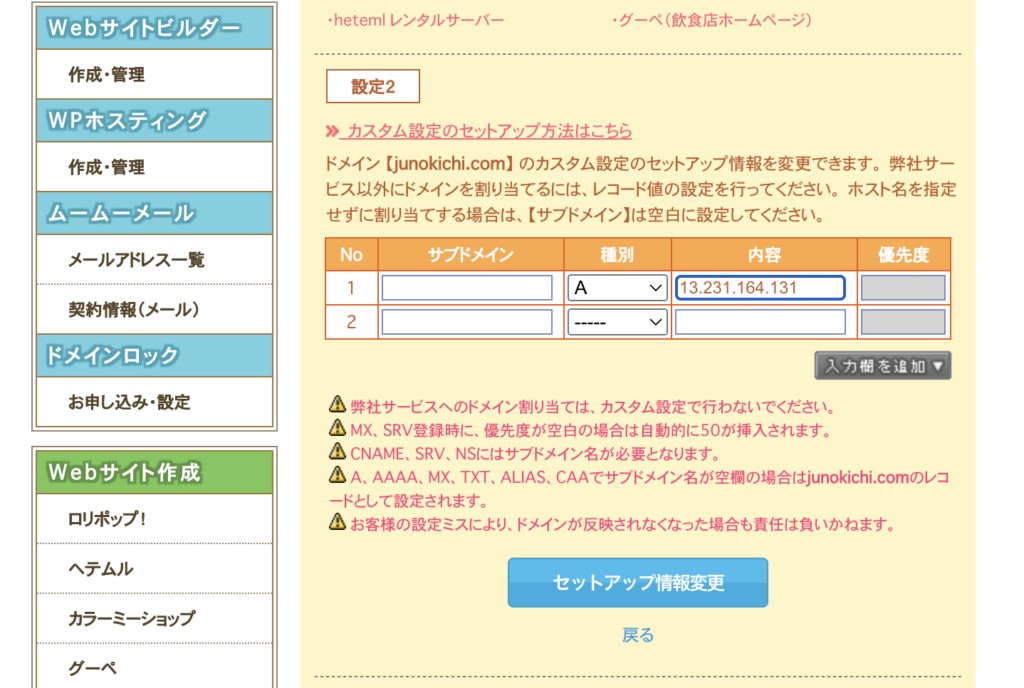
これでDNSの設定まで完了です。
DNSの反映にはしばらく時間がかかります。
SSL化
続いて、https化していきます。
まずLightsailのファイアウォールではデフォルトでhttpsの443ポートが解放されていないため、設定する必要があります。
Lightsailのコンソールでネットワーキングを表示してください。
IPv4 ネットワーキングのルールを追加の部分で「HTTPS」を作成してください。
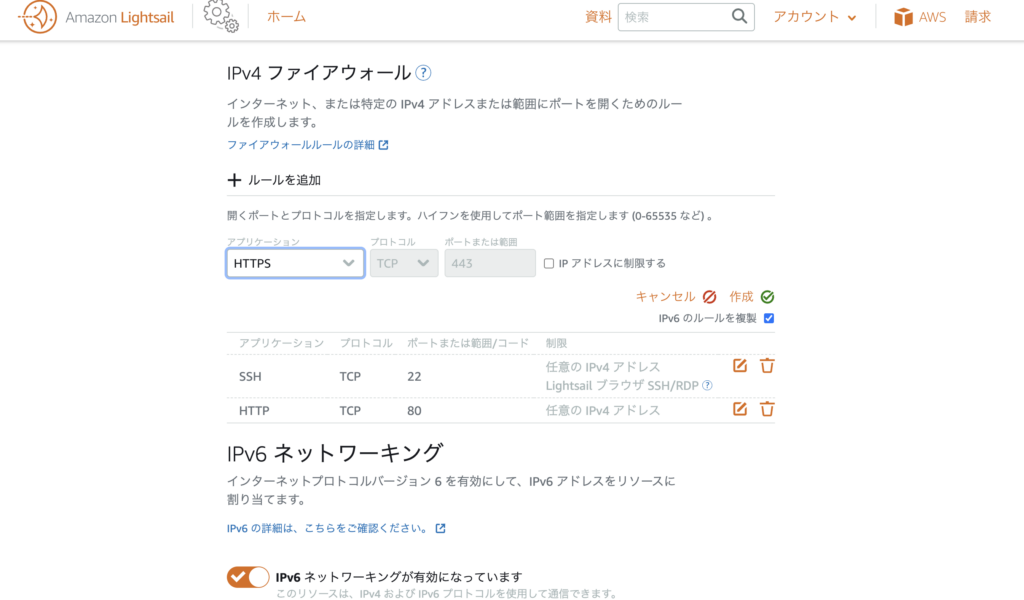
これでファイアウォールの設定は完了です。
続いて、Apacheの設定ファイルにドメインを設定します。
$ sudo vim /etc/apache2/sites-enabled/000-default.confServerNameのコメントアウトをとり、自分のドメインを記述します。
ServerName www.example.com続いて、SSL化の設定をしていきます。
今回のSSLは無料のLet’s Encryptを利用してみます。
まずはCertbotをインストールと実行をします。
$ sudo apt-get install certbot python3-certbot-apache
$ sudo certbot --apache

Enter email address (used for urgent renewal and security notices) (Enter 'c' to
cancel): xxx@yyy.co.jp # ご自身のメールアドレス

You must agree in order to register with the ACME server at
https://acme-v02.api.letsencrypt.org/directory
(A)gree/(C)ancel: A

Would you be willing to share your email address with the Electronic Frontier
Foundation, a founding partner of the Let's Encrypt project and the non-profit
organization that develops Certbot?
(Y)es/(N)o: N

Which names would you like to activate HTTPS for?
----------------------------------------
1: xxx.yyy.co.jp
----------------------------------------
 (Enter 'c' to cancel): 1

Please choose whether or not to redirect HTTP traffic to HTTPS, removing HTTP access.
----------------------------------------
1: No redirect
2: Redirect
----------------------------------------
(press 'c' to cancel): 2

Congratulations! You have successfully enabled https://xxx.yyy.co.jp
以上でドメインとSSL化が完了です。
ドメインにアクセスして確認してみましょう。
SSL 証明書の自動更新
Let’s Encrypt の SSL 証明書は期限が3ヶ月と短いです。そのため、期限が来たら自動更新する設定にしておきます。
$ sudo systemctl status certbot.timerこれで完了です!
2025年エンジニアの必読書
エンジニアなら読んでおきたい必読書を紹介します。

コード×AI―ソフトウェア開発者のための生成AI実践入門
もうプログラムを書く時代は終わりました。これを読めば「AIでここまでできるのか!」やばいな!と実感する一冊です。これを読まずにただ自力でプログラムを書いている人はもう手遅れになるかもしれません。
Amazonで購入する
AIエディタCursor完全ガイド ―やりたいことを伝えるだけでできる新世代プログラミング
まだCursor使っていないの?こちらはAI機能が搭載されたエディタです。直近、AIの進化が著しく精度がかなり上がっています。もはや人を超えたと言っても過言ではないでしょう。Cursorを使えばもうプログラミングをすることはほぼなくなります。まだ使っていない方はこちらで使い方を学びましょう。
Amazonで購入する
良いコード/悪いコードで学ぶ設計入門
初心者にもおすすめ!全エンジニアの良いコードの書き方のバイブルです。2024年12月25日に発売されたばかりの最新版が登場。AI時代でも良い設計は必須スキル。あなたのコーディングスキルが飛躍的に向上することでしょう。
Amazonで購入する